Visio users and developers often wonder how to distribute their newly created Visio shapes to their colleagues, friends and family (all depends on your friends and family I guess J). Visio offers two mechanisms to publish content, each suited to different situations. This blog entry covers both. But first, an introduction for those new to content creation.
What’s content?
In the Visio world, content refers to shapes, stencils and templates; if you’re familiar with these concepts, please skip to the next section, if not please read on.
· Master shapes are the basic unit of content; they are Visio entities that you can assemble on a drawing page that graphically represent a real-world object or concept. Visio provides a rich set of pre-made master shapes and also enables the creation of custom shapes. To get started authoring shapes, read through this Archive of Visio Insights blog (2006-2018) blog posting as well as this set of documents from Microsoft Office Online.
· Stencils are collections of related master shapes that are presented together in the UI. Again Visio provides a large set of pre-made stencils and lets you create your own stencils containing custom made and/or pre-built Visio shapes by following the steps outlined here. Stencils files have a “.VSS” or “.VSX” extension.
· Templates are Visio files that set up the Visio workspace for a particular drawing type by opening appropriate stencils, opening anchored windows and setting page properties such as scale and grid. For example the Space Plan template that ships with Visio opens four stencils, changes paper size and scaling. Instructions on how to create templates may be found here. Template files have a “.VST” or “.VTX” extension.
Publishing Content
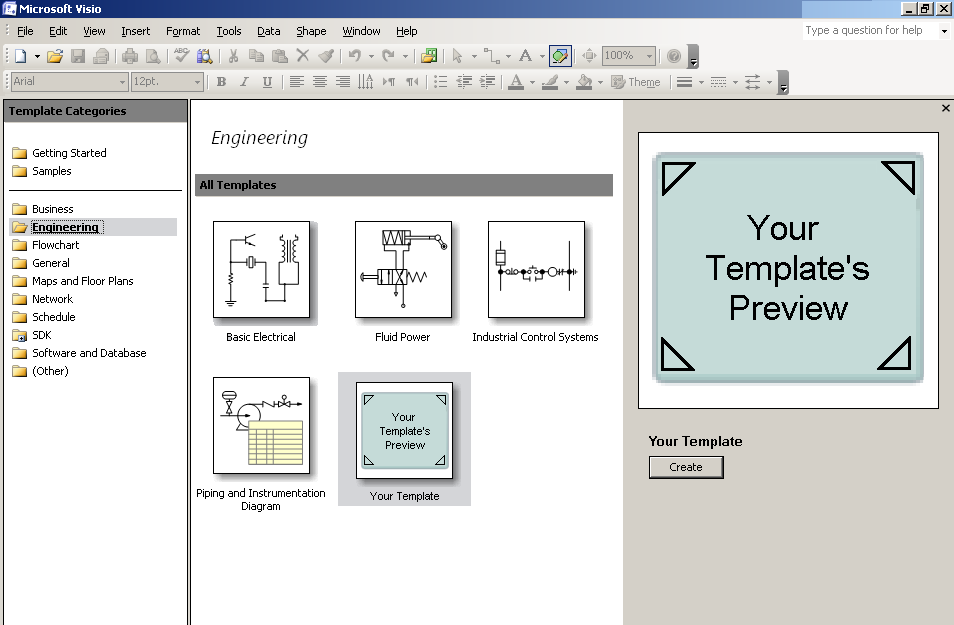
Publishing a piece of content to Visio adds entry points to the user interface side-by-side with content created by Microsoft. For a stencil this translates into a menu entry added to the File > Shapes fly-out menu while for a template this means an entry in Visio’s startup screen (as seen below) and in the File > New fly-out menu. In this blog entry we will focus on publishing templates to Visio; publishing stencils is quite similar.
Method #1: Sharing Templates using Path Discovery
The simplest way to publish a template to Visio is to use the Path Discovery method described below:
1. Copy your template and supporting stencils to a known location on a drive.
2. Add the location defined in step 1 to Visio’s “Template Paths”; this tells Visio where to find extra content to populate its startup screen. This can be done manually by following the steps here or may be automated using code that sets the TemplatePaths property on the Visio Application object.
3. Restart Visio – your template should appear in the (Other) category.
The advantages of this approach are:
· It is simple.
· It is supported across most versions of Visio.
It however has a few drawbacks:
· Your users may be subjected to potentially long and error prone manual work.
· Your templates will always end up in the (Other) content category in the startup screen.
· You don’t have any way of repairing content on a user’s machine if it gets damaged.
· You cannot control which language of Visio will load your stencils and templates.
· This approach does not scale well. The Path Discovery publishing method does just that: every time you boot Visio it searches a user’s hard drive for content files – an expensive operation.
Sharing templates through Path Discovery is good for small scale content deployments as well as deployments to older versions of Visio.
Method #2: Sharing using the PublishComponent System
The PublishComponent system introduced in Visio 2003 lets developers use Windows Installer technology for template distribution to register their content with Visio in a richer and more robust way. The main advantages of this method are quite interesting:
· The Windows Installer setup wizard is familiar to users and easy to use.
· You may choose where your content appears in the File > Shapes or startup screen hierarchies.
· You benefit from Windows Installer repair, install-on-demand and add/remove features.
· You may choose what language versions of Visio to publish your content to.
· The approach scales well: Visio only rebuilds its content cache, a moderately expensive operation, when new content is published.
· The approach is tried and tested since the product publishes its own content this way since the 2003 release.
That said, using the Publish Component system is:
· A little more complicated than the Path Discovery method.
· Will only work for Visio 2003 and or later.
To use this method you’ll need Visual Studio .NET or later, the Visio 2003 SDK (or the Visio 2007 Beta SDK) and the following steps:
- Create a setup project in Visual Studio.
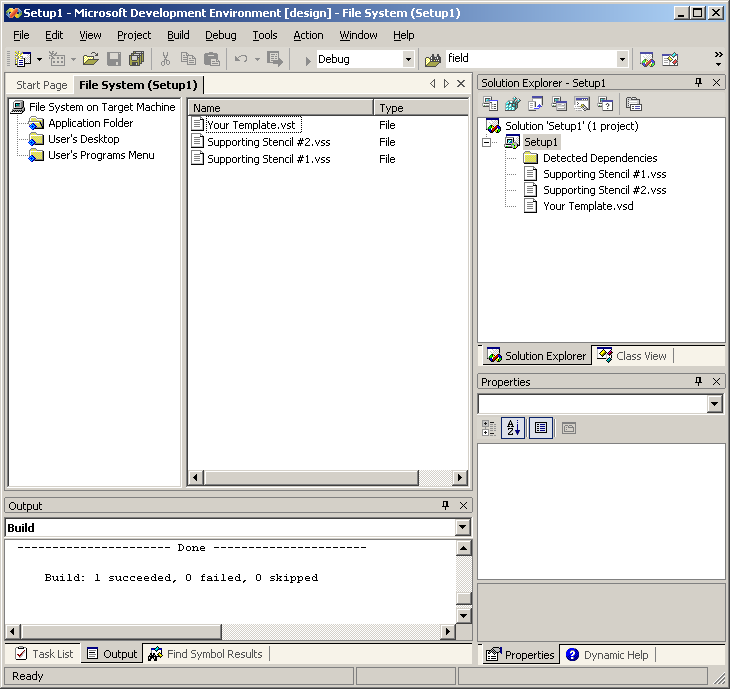
- Select the "Application folder" and change its default location property to your target install location. Add your template and their supporting stencils to this location by dragging files into the folders. Your project should look something like the figure below at this point.
- Build the project. This will produce an MSI file - a multi-table installation database that is used by windows to coordinate setup.
If you installed the package as it is; Visio would not discover the files the MSI installed. To notify Visio on the whereabouts of these files, the next thing to do is populate the PublishComponent table of the MSI produced above with registration data. Once installed, this extra information will force Visio to rebuild its content cache and incorporate and display the new templates and stencils.
The extra information you need to add may be found here. Be warned however, it is not for the faint of heart to enter this data manually. For those of us who would rather not spend their Saturday night writing MSI tables entries you can follow the steps below using the PublishComponent tool shipped in SDK to populate the appropriate MSI table easily:
- Install the Visio SDK & start the publish component tool (this tool may be found in the Start menu entry for the Visio SDK).
- On the File menu, select New. It will prompt you for an MSI; navigate to the one that you've just built.
- This will present the Visio Files that are in MSI. You must now, for each entry:
- Set the LCID of the language for which you want the templates to be accessible in. Do the same for the supporting stencils.
- Set the position in the Visio startup screen hierarchy you want the template to live in. This is defined by separating different levels of the hierarchy by “” symbols for example: “MyTemplateCategoryMyTemplateSubCategoryMyTemplateName”. Do the same with the supporting stencils, setting their location in the File > Shapes fly-out.
To make the changes described above double click on each entry to bring up the “Template Information” dialog seen below, or its counterpart the “Stencil Information” dialog.

- Press the "!" button in the tools toolbar; this will make modifications to the MSI's Publish Component table.
- Voilà… you’re done.
The MSI can now be distributed; Windows Installer and Visio will do the rest. Although we haven’t discussed it here, the same techniques can be used to publish add-ins and help files. For the curious, use ORCA and the guidance in the KB article above to understand what modifications the tool made to the MSI.
As a final note, you’ll see that the template you just published shows up in the startup screen, however the template preview is blank; I’ll leave it up to crafty souls out there to figure out how to get template preview’s this working… OR you could stay tuned to the Archive of Visio Insights blog (2006-2018) blog for more info =).