Connectors are used to connect shapes in Visio. They are one of the most important elements of the diagram and are required to convey flow and relationship between shapes. Most diagrams, such as, flowcharts, org charts and hierarchy diagrams, need connectors.
To draw a connector, on the Home tab, in the Tools group, select the Connector tool. Now you can simply draw a connector on your canvas with the help of mouse selection.
Each section in this article addresses tip and tricks around the following scenarios:
- Use a static or a dynamic connection
- Connect shapes automatically
- Format connectors
- Select all connectors quickly
- Locate and set re-routing
- Locate and set glue settings
- Add line jumps
- Use connectors with multiple labels
- Locate the Developer tab
Please share any feedback or comments that you may have on Visio User Voice or email us at tellvisio@microsoft.com
Use a static or a dynamic connection
A connector can be glued either to shapes or connection points on shapes. A static connection is the one that glues to connection points on shapes while a dynamic one connects to shapes in general.
Static connection
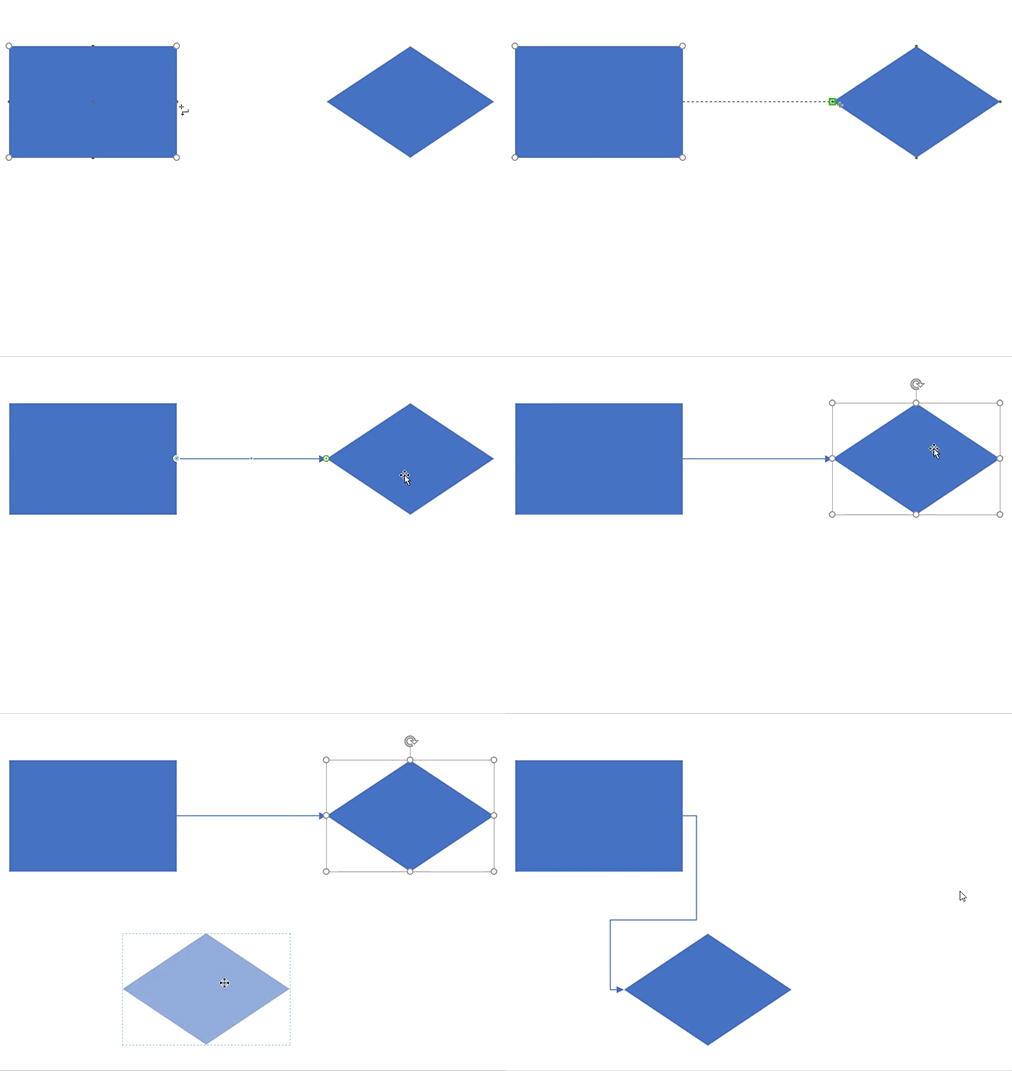
A static connection maintains glue to the connection point when shapes are moved around. To create such a connection, select the connector tool from the ribbon and drag from one connection point to the other. The connection points get highlighted with a green outline on hovering.
Dynamic connection
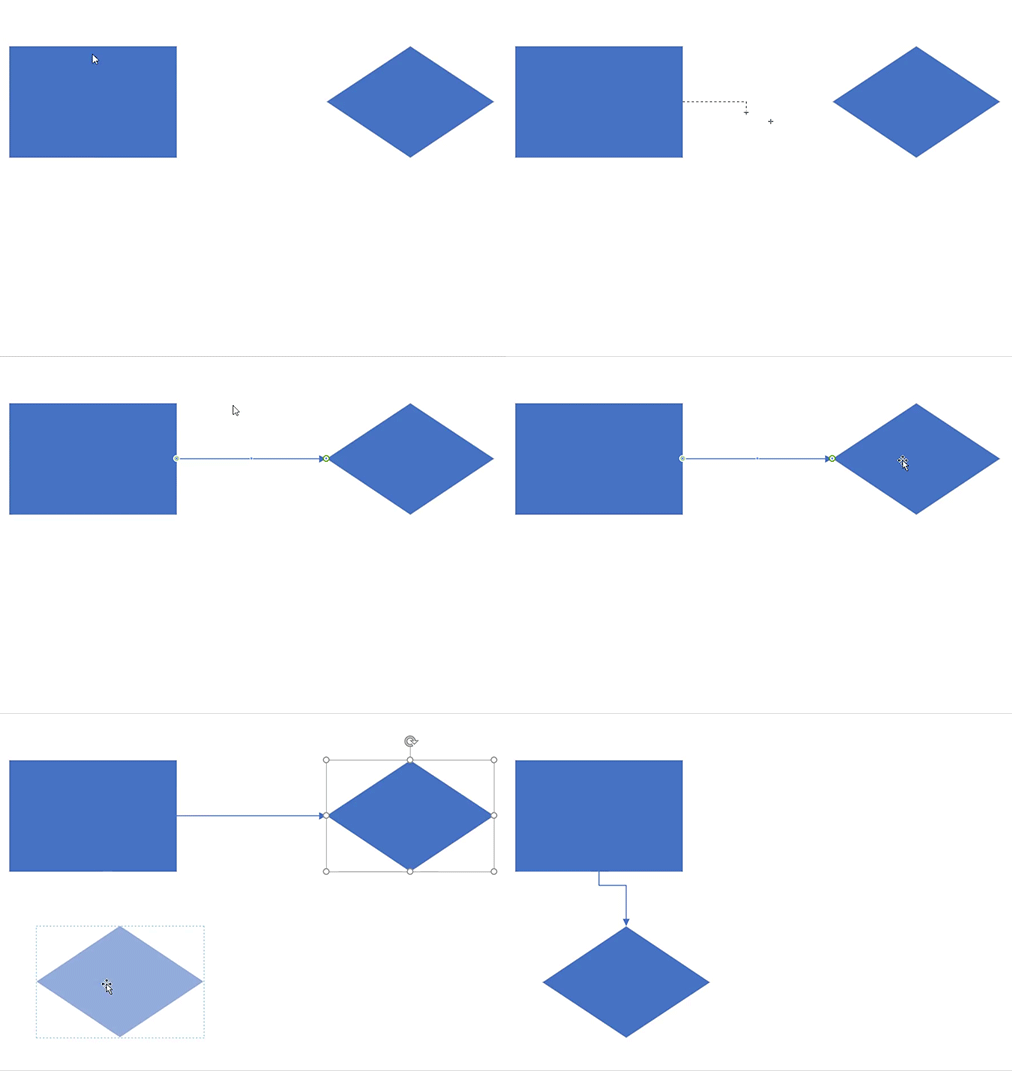
A dynamic connection maintains connection to the shape when shapes are moved around and finds the shortest route between the connected shapes. To create such a dynamic connection between shapes, select the connector tool from the ribbon and drag from one shape to another. The shape gets highlighted with a green outline on hovering.
Static and dynamic connection
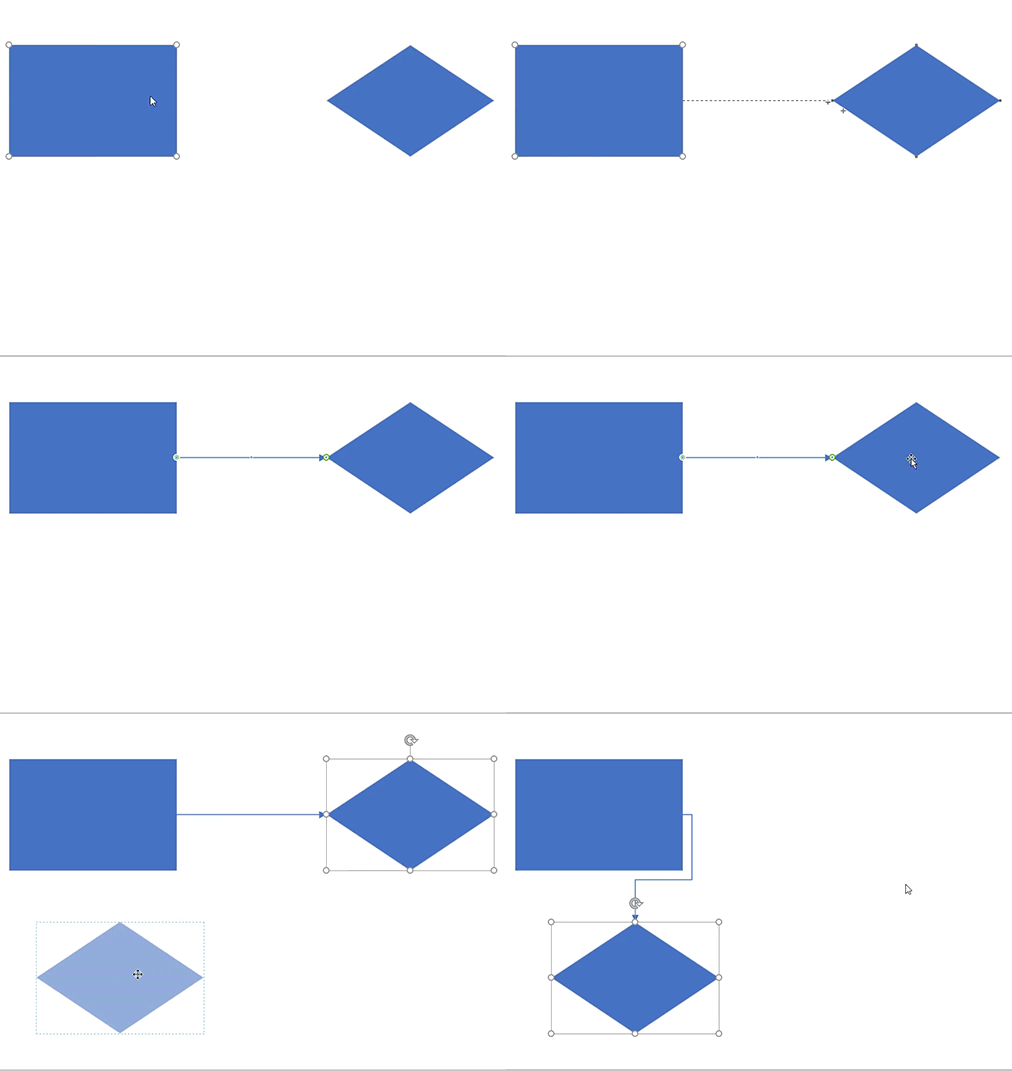
It is also possible to use a connector where one end of the connector has a static connection to a connection point on a shape while the other end has a dynamic connection to the shape.
On moving the decision shape, the connector is still connected to the same connection point on the rectangle shape to which it was initially connected, while it connects to another connection point on the decision shape compared to the initial connection point it was connected to. Connection to the rectangle shape is static while connection to the decision shape is dynamic.
Connect shapes automatically
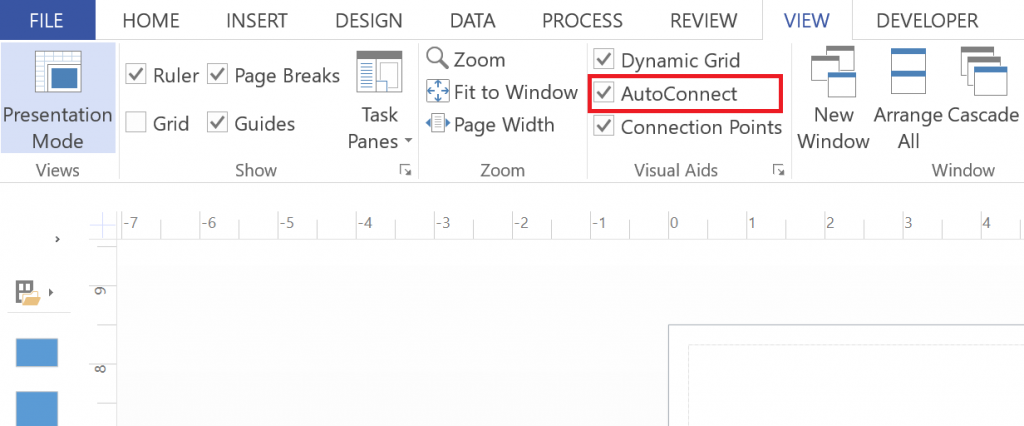
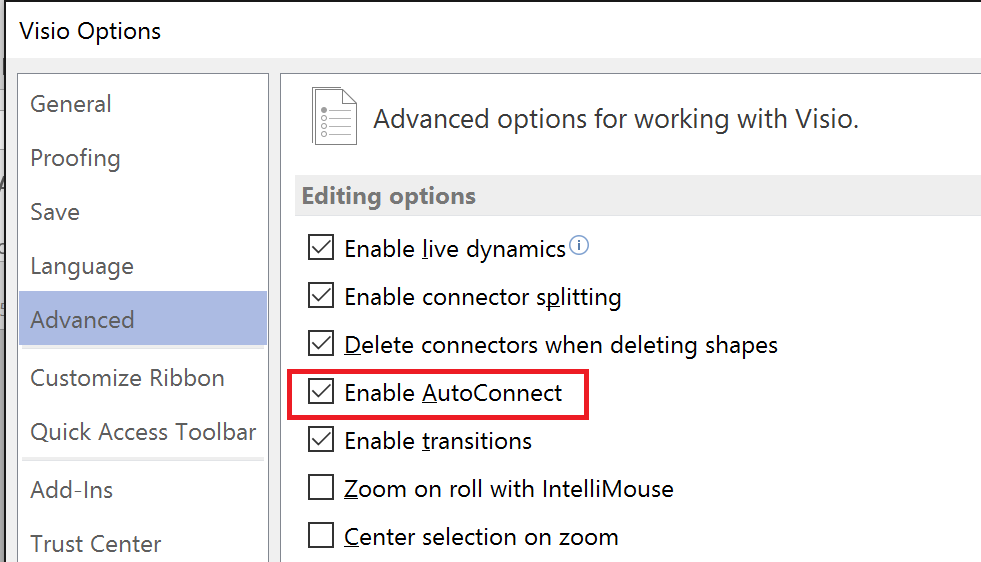
You can choose to let Visio connect shapes automatically while adding shapes to your diagram. This is especially helpful while creating flowcharts. To do so, you need to make sure that AutoConnect is active. AutoConnect can be turned on or off at the document or at the application level.
On the View tab, in the Visual Aids group, verify that AutoConnect is selected. Selecting AutoConnect from View tab sets AutoConnect to active for the current drawing only [Document level setting].
You can also turn AutoConnect on or off for all drawings from the backstage menu: File > Options > Advanced [Application level setting].
Now, hold the pointer over the shape such that the AutoConnect arrows appear. Further, hold the pointer over the arrow in the direction in which you want to add a shape. A mini-toolbar with the first four shapes in the Quick Shapes stencil appears. Select the shape you want to add.
Format connectors
Oftentimes, you may want to modify how your connectors look. For instance, adding/removing arrow-heads, changing solid line to dashed or dotted, changing weight, etc. You can format connectors by doing either of the following:
From the Ribbon
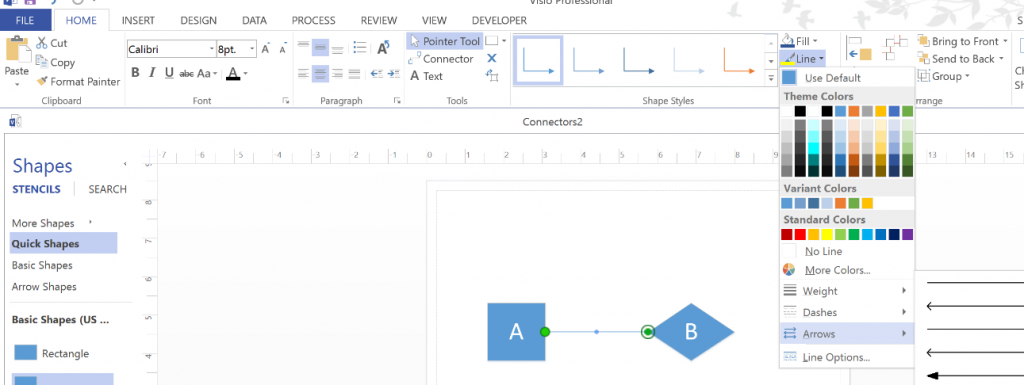
Select the connector/s you want to format. On the Home tab, in the Shape Styles group, use the Line drop down which allows changing the color or weight of the line, adding/removing/changing arrow heads, etc.
From the right-click menu
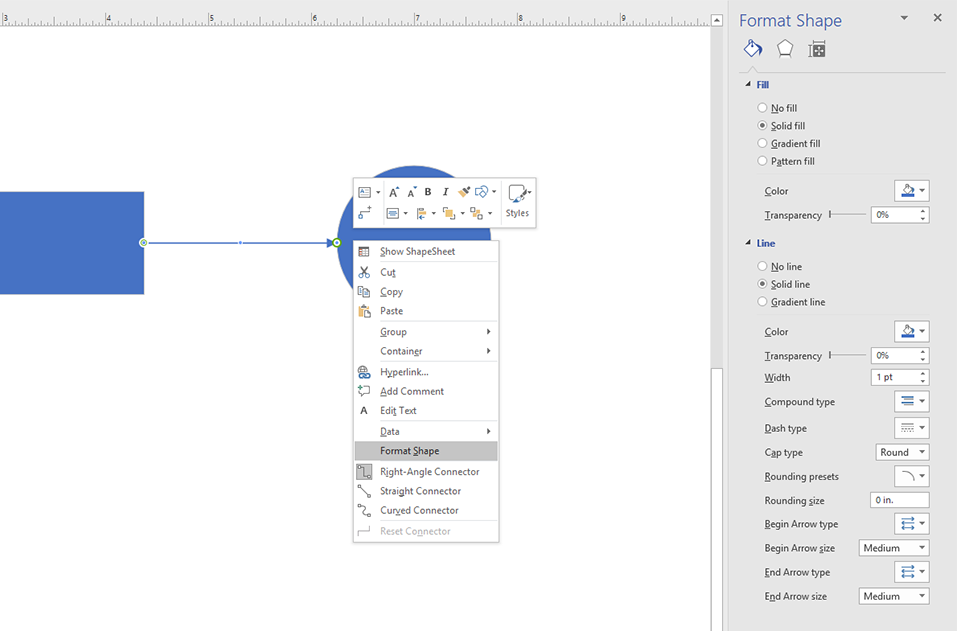
Right-click on the connector and choose Format Shape from the menu. The Format Shape pane opens to the right of the canvas. You can modify the connector from options in the Line section.
Select all connectors quickly
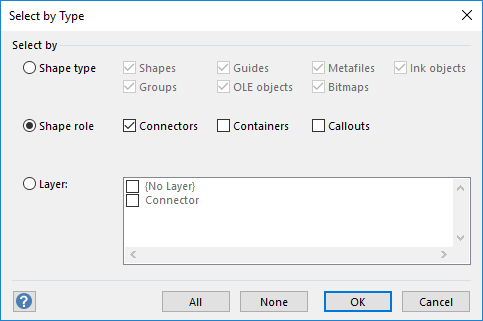
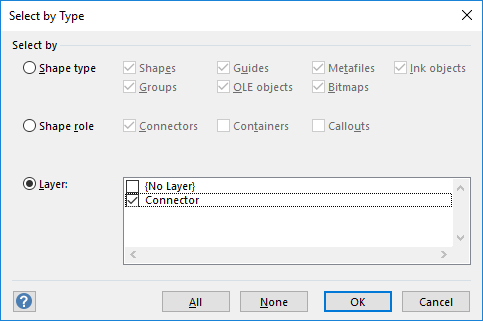
Occasionally, you may want to select all the connectors on your page to apply a change. For instance, you may want to change all the connectors on your page to dashed instead of solid lines. So you want to select them all quickly. To do so, you can select them by type as detailed below.
On the Home tab, in the Editing group, from the pop-up list in Select, choose Select by Type.
In the Select by Type window you can choose either of the below options to select all connectors:
- Shape role
- Layer
Locate and set re-routing
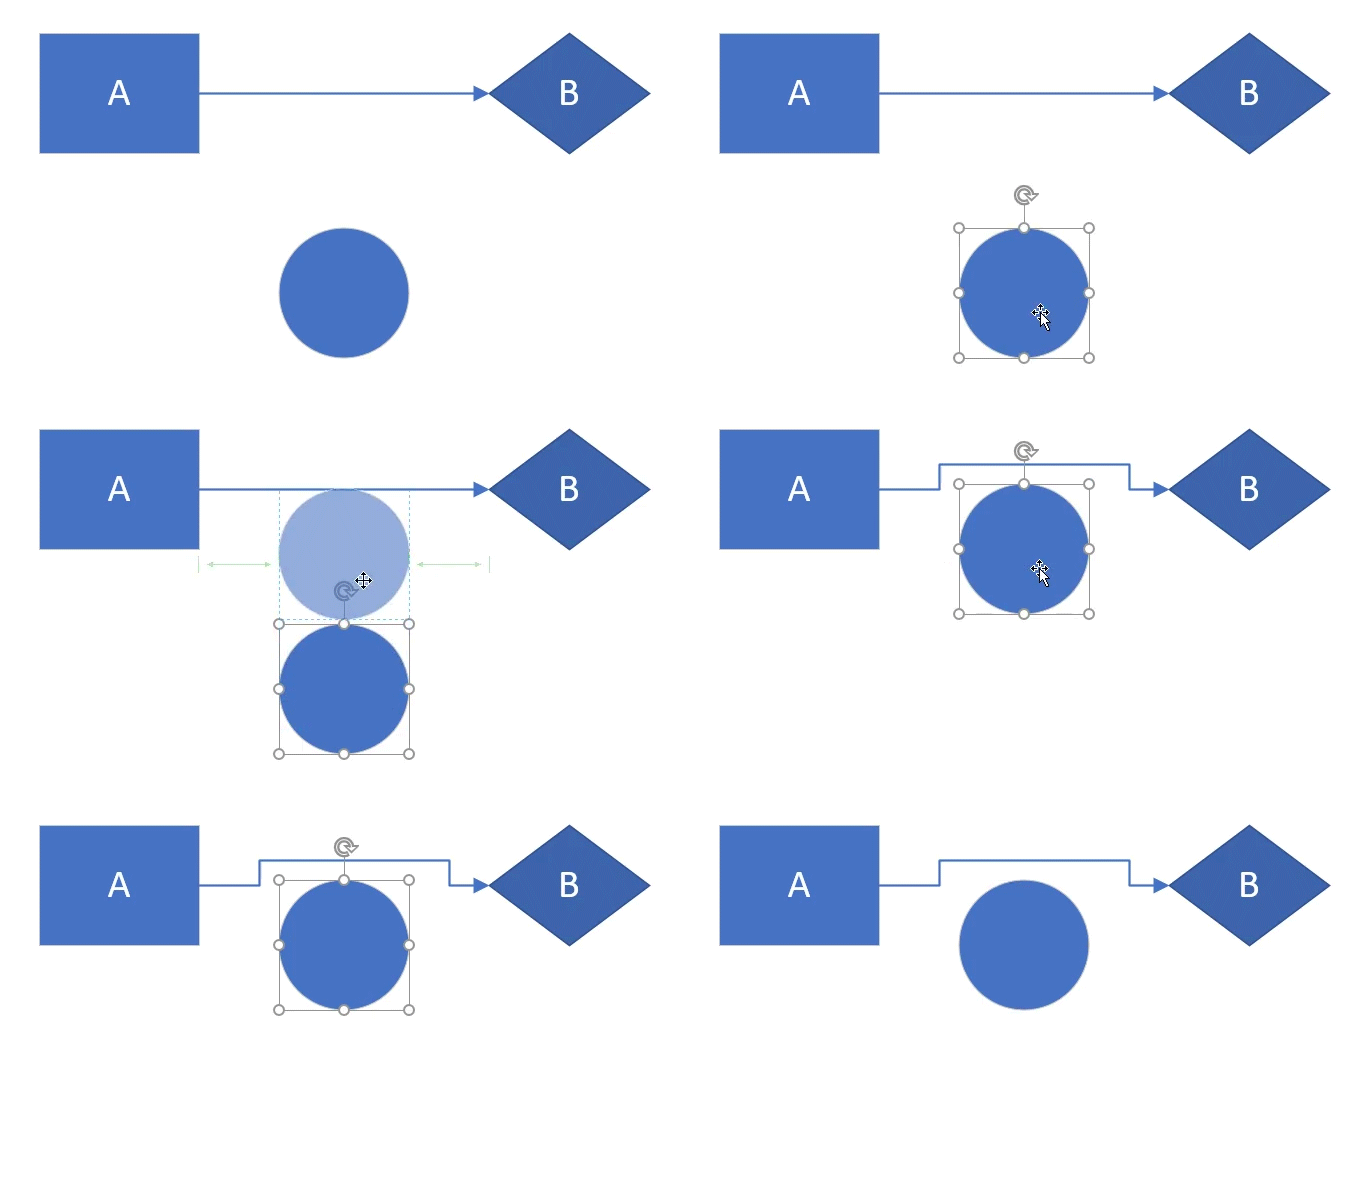
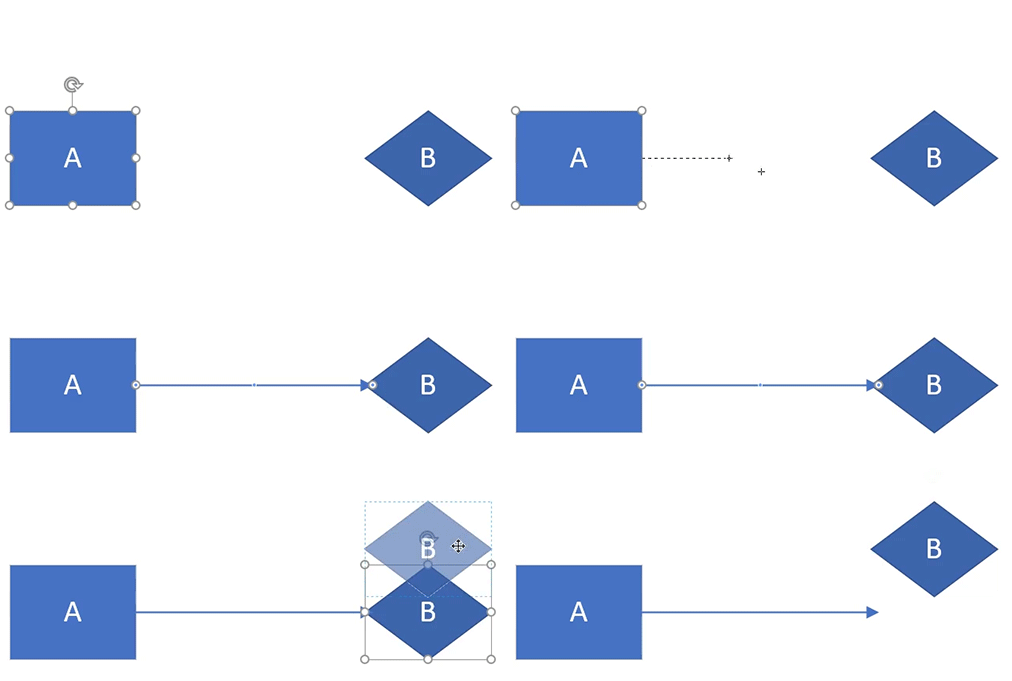
If your connectors are automatically re-routing or moving away on dragging a shape near it (as shown below) while this is not the behavior that you want, there are a few settings that could be causing this and hence can be altered to achieve the required behavior.
Behavior settings for the shape that is causing the connectors to move away [Shape-level setting]
- Select the shape that is causing the connector to move away.
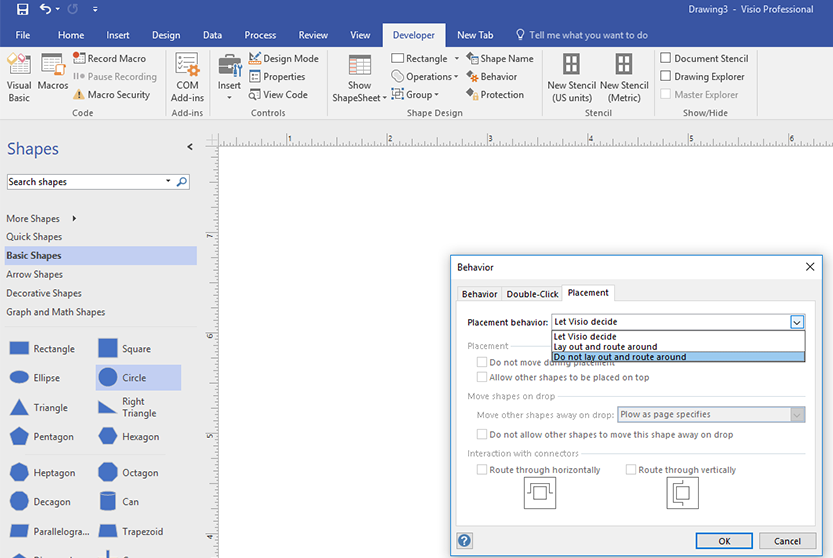
- On the Developer tab (refer the section for locating Developer tab), in the Shape Design group, click on Behavior. In the Behavior settings window that opens, go to the Placement tab.
- In the Placement behavior dropdown, select either of the below:
Do not lay out and route around
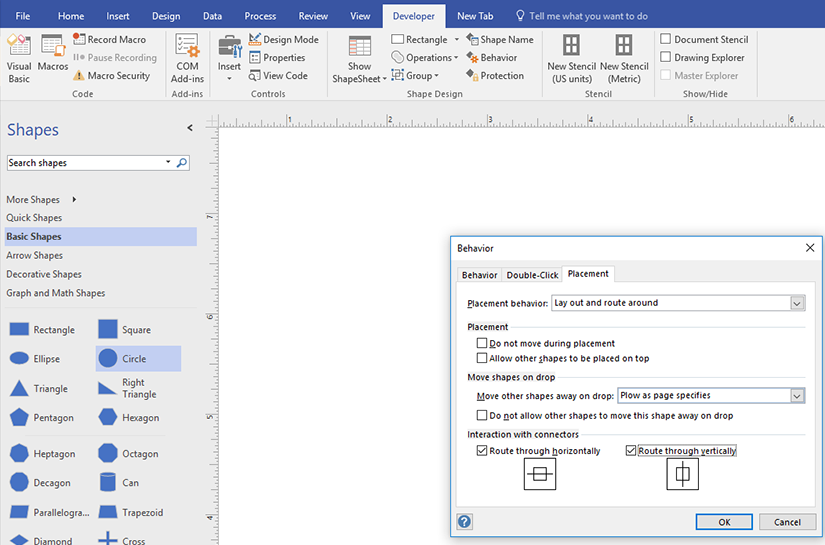
Lay out and route-around
Check the check-boxes for horizontal and vertical routing through the shape in the Interaction with connectors section.
Behavior settings for the connectors [Shape-level setting]
You can choose to change settings for the connectors instead of the shapes that are causing the re-routing.
- Select the connector/s. On the Developer tab (refer the section for locating Developer tab), in the Shape Design group, click on Behavior.
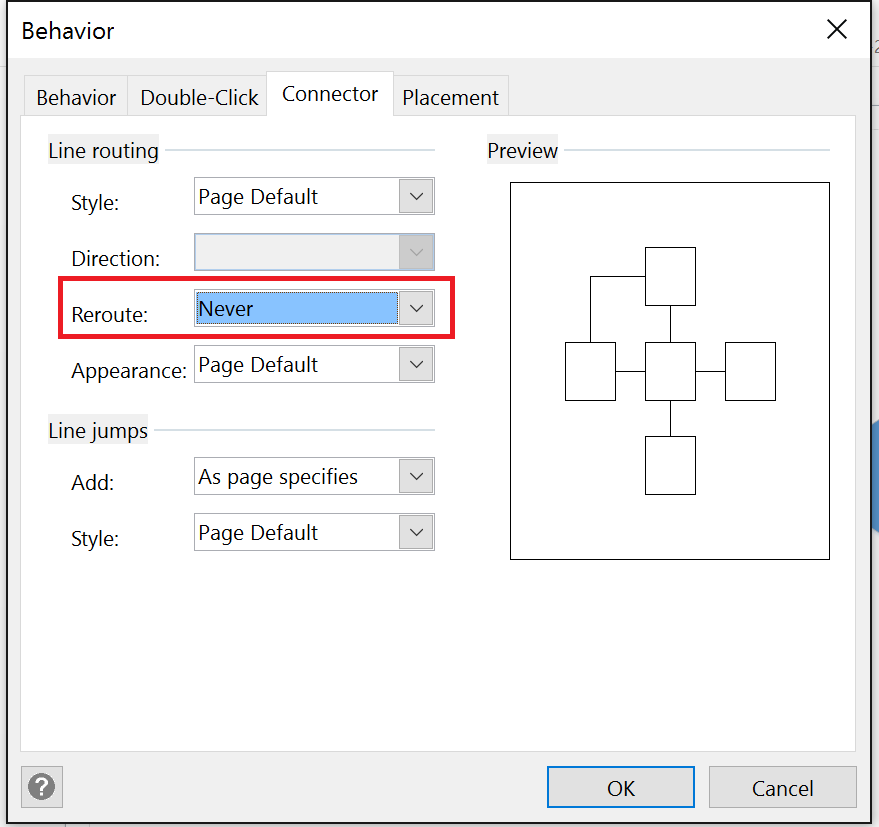
- In the Behavior settings window that opens, go to the Connector tab. In the Line routing section, choose Reroute as never from the drop down list of options.
Locate and set glue settings
If your connectors are not sticking to shapes while trying to connect shapes or are losing connect to shapes when shapes are moved (as shown below), then you may want to check if your Glue settings are active. When a connector is glued or attached to a shape, it retains the connection to the shape even when the shape is moved around.
Glue settings are available at the layer level and document level. So, in effect, layers and documents retain their glue settings unless changed.
Layer-level glue settings
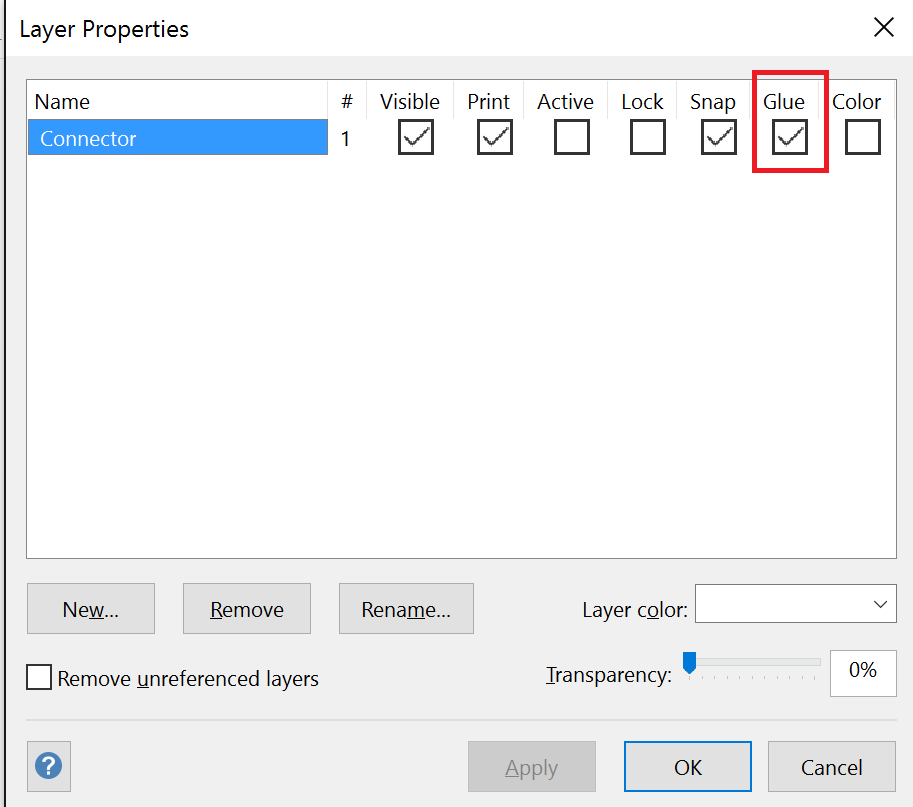
To make Glue active for the Connector layer, on the Home tab, in the Editing group, from the Layers pop-up, select Layer properties.
Document-level glue settings
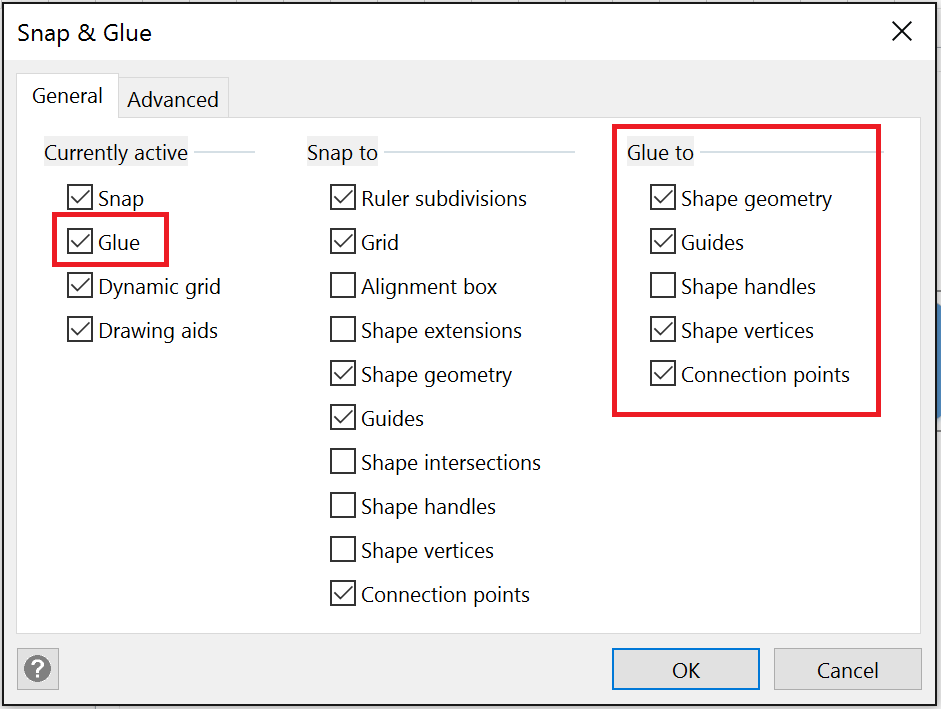
To open Snap and Glue settings, on the View tab, in the Visual Aids group, click on the pop-out icon.
In the Snap & Glue settings window, make Glue active.
Note The connectors that were drawn with the glue settings off will not automatically get connected to shapes. These must be connected to shapes after setting on the Glue and will retain the glue to shapes thereafter, even when shapes are moved.
Add line jumps
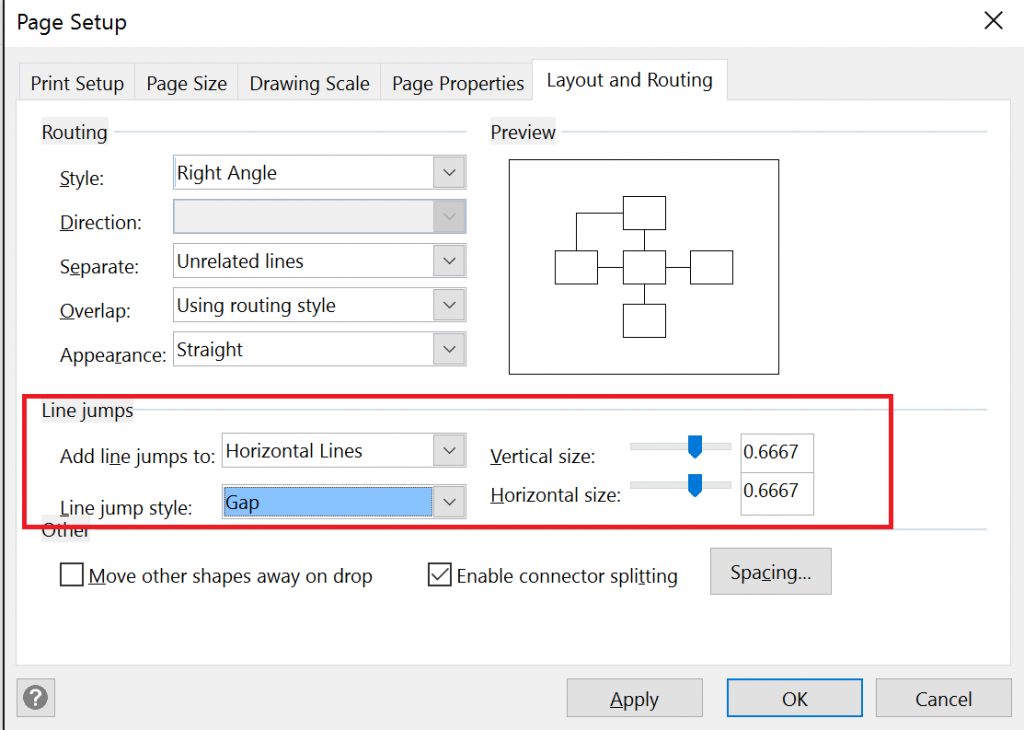
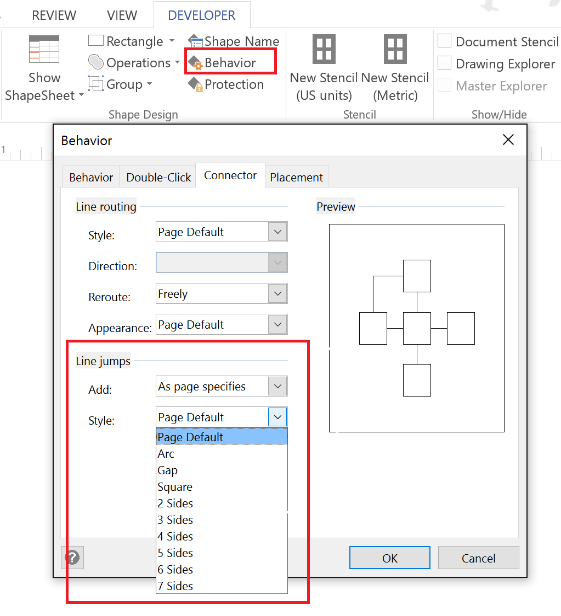
You may want to choose the line jump style for cross-over connectors to be a gap or an arc or a square and so on. These settings are available at the page level as well as at the shape (connector) level.
Page-level
- Right-click on the page tab below the canvas and open Page Setup from the pop-up menu.
- In the Page Setup window that opens, go to the Layout and Routing tab.
- In the Line jumps section, you can choose the line jump style from the dropdown.
You can choose the line jump style to be a Gap or a Square or an Arc and so on.
Shape-level
- Select the connectors.
- On the Developer tab, in the Shape Design group, click on Behavior.
- In the Behavior settings window that opens, go to the Connector tab.
- In the Line jumps section, choose your preferred Line jump style from the drop down list of options.
Use connectors with multiple labels
Users have often provided feedback about the need to use connectors with multiple labels. The connector used from the Home tab on the ribbon can support only one label.
A quick workaround
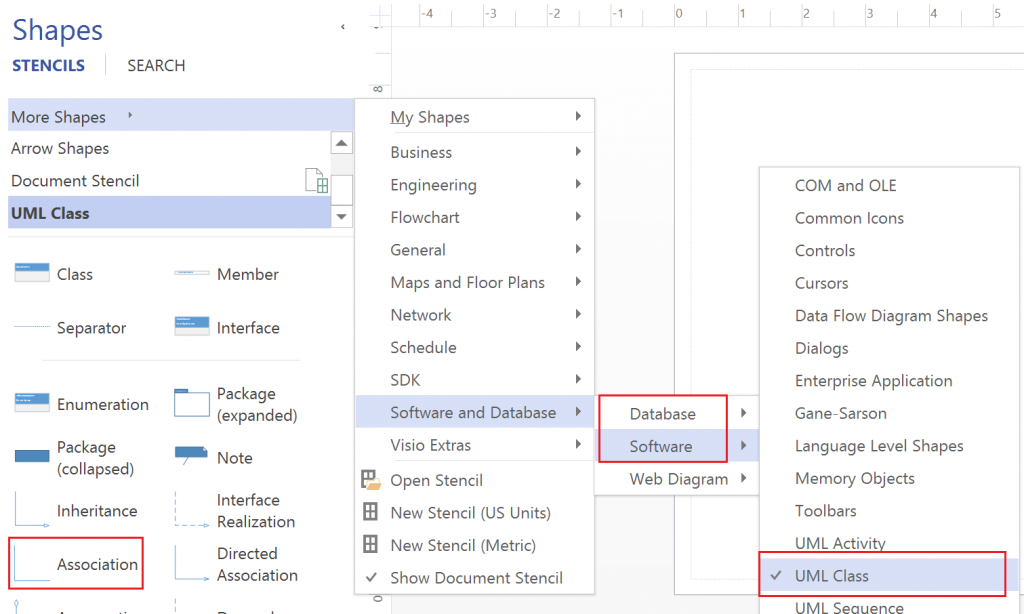
A workaround for Visio Professional that is often suggested is to use Relationship or Relationship connector or Association shape from UML class stencil and database related stencils in Software and Database category and choose to show multiplicity for these connector shapes. Note that these stencils are available for use only in the Professional and Pro versions of Visio. To use these stencils, go to the Stencils pane on the left, choose More Shapes, hover over Software and Database in the fly-out and choose either UML Class stencil or any of the database stencils.
Right click on the Relationship or Relationship connector or Association shape dragged from software and database stencil/s and choose Show multiplicity.
Use ShapeSheet
If you are comfortable using formulae in ShapeSheet (Right-click on shape -> Show ShapeSheet), you can benefit from this interesting way to set multiple labels. Add text boxes to the canvas. Use formulae in the Shapesheet of the textboxes with reference to Shapesheet of the connector to place them appropriately near the connector as labels, such that when connector is moved, the textboxes (labels) move too. Refer example below:
Shapesheet of the Connector (Shape name is ‘Dynamic connector.1001’) to which textbox will be attached:
Shapesheet of the textbox (Shape name is ‘Sheet.1003’) which we want to use as a label:
Here the PinX and PinY cells of the textbox have a reference to BeginX and BeginY cells of the Dynamic connector. Similarly, another textbox can be added to the canvas which has its PinX and PinY referring to EndX and EndY of the Dynamic connector as shown below:
This would lead to labels getting attached to the connector.
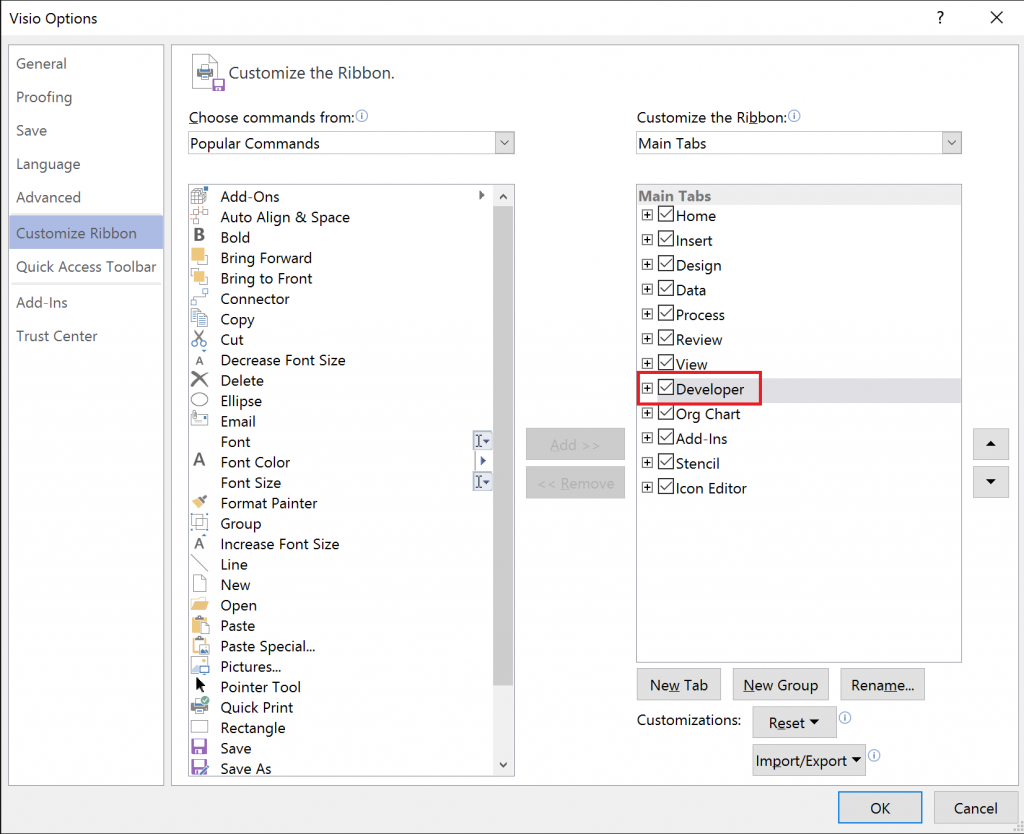
Locate the Developer tab
To locate the Developer tab, select File > Options > Customize Ribbon > Check the checkbox for Developer tab in the right-hand side column of main tabs.
We’re constantly looking for ways to improve Visio and invite you to send us your ideas through our UserVoice site. For questions about Visio connectors and other features, feel free to drop us an email at tellvisio@microsoft.com. You can follow us on Twitter, LinkedIn, Facebook and YouTube for latest on Visio.
— The Visio Team


